WinWarbler Online Help Contents
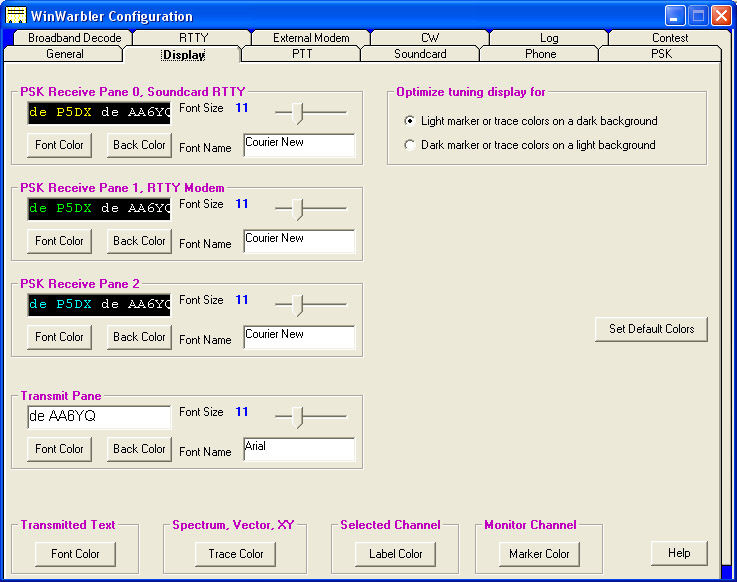
The Display tab of WinWarbler's Configuration screen contains panels that control the appearance of received text, transmitted text, and the Spectrum, Vector, and XY displays. (screen capture)
The following settings are provided in panels for each of the three receive panes:
| Font Color | clicking this button displays a color selector that lets you choose the color of the pane's received text; this same color is displayed on the identification panel to the left of each receive pane, and identifies the associated channel's waterfall trace |
| Back Color | clicking this button displays a color selector that lets you choose the color of the receive pane's background color |
| Font Name | displays the name of the font used to display text appearing in the receive pane; clicking this control displays a standard Windows font selector, allowing you to choose any available font, specify its point size, and specify whether it is to be rendered in bold and/or italics |
| Font Size | this slider displays and controls the point size of text appearing in the receive pane |
Changing font characteristics can make a pane's existing text unreadable; thus such modifications should be avoided while in QSO.
The Transmitted Text setting controls the color of transmitted text in all three receive panes:
| Font Color | clicking this button displays a color selector that lets you choose the color of transmitted text |
When a receive channel is selected, the label to the left of its pane (on WinWarbler's main screen) is given a unique color; The Selected Channel setting specifies this color. Since each channel label appears over a panel whose color matches the font color of its associated receive pane, choose a color for the selected channel label that contrasts with all three receive pane font colors.
| Label Color | clicking this button displays a color selector that lets you choose the color of the channel label for the currently-selected receive pane |
The Optimize tuning display for panel determines whether Monitor Channel markers will be shown against a white background and tuning display trace borders will be rendered in black, or Monitor Channel markers will be shown against a black background and tuning display trace borders will be rendered in white. If you select light receive pane font colors and dark receive pane background colors, then you should chose Light marker or trace colors on a dark background and select a light Monitor Channel marker color (e.g. white) . If you select dark receive pane font colors and light receive pane background colors, then you should chose Dark marker or trace colors on a light background and select a dark Monitor Channel marker color (e.g. black) .
Changes made to the above settings are immediately applied, so you can assess your customization by direct observation. To reduce the need for flipping between windows on systems with smaller screen sizes, each panel contains a preview textbox illustrating the appearance of both received text (on the left) and transmitted text (on the right).
The following settings are provided for the transmit pane:
| Font Color | clicking this button displays a color selector that lets you choose the color of keyboard-generated or macro-generated text |
| Back Color | clicking this button displays a color selector that lets you choose the transmit pane's background color |
| Font Name | displays the name of the font used to display text appearing in the transmit pane; clicking this control displays a standard Windows font selector, allowing you to choose any available font, specify its point size, and specify whether it is to be rendered in bold and/or italics |
| Font Size | this slider displays and controls the point size of text appearing in the transmit pane; the transmit pane's height is automatically scaled to properly display the selected font size |
The following settings are provided to control the rendering of frequencies in the tuning display's frequency scale:
| Font Name | displays the name of the font used to display frequencies; clicking this control displays a standard Windows font selector, allowing you to choose any available font, specify its point size, and specify whether it is to be rendered in bold and/or italics |
| Font Size | this slider displays and controls the point size of frequencies |
| highlight PSK & RTTY sub-bands | when checked, highlights PSK sub-bands and RTTY sub-bands in the tuning display's frequency scale by coloring displayed frequencies and tick-marks |
| Sub-band Color | clicking this button displays a color selector that lets you choose the color of frequencies and tick-marks within PSK sub-bands and RTTY sub-bands to be used if the highlight PSK & RTTY sub-bands setting is enabled |
| Out-of-sub-band Color | clicking this button displays a color selector that lets you choose the color of frequencies and tick-marks that are not within PSK sub-bands and RTTY sub-bands to be used if the highlight PSK & RTTY sub-bands setting is enabled |
| Trace Color | clicking this button displays a color selector that lets you choose the color of the trace used to render the spectrum display, vector, and XY display |
| Marker Color | clicking this button displays a color selector that lets you choose the color of the markers used to designate the frequency of each locked monitor channel |
Clicking this button sets all colors to reasonable default values. If incoming text is not visible because font colors and background colors lack sufficient contrast, this function will rectify the situation.