Configuring the BobCAT SDR Console for use with a Perseus
de Jay W5JAY
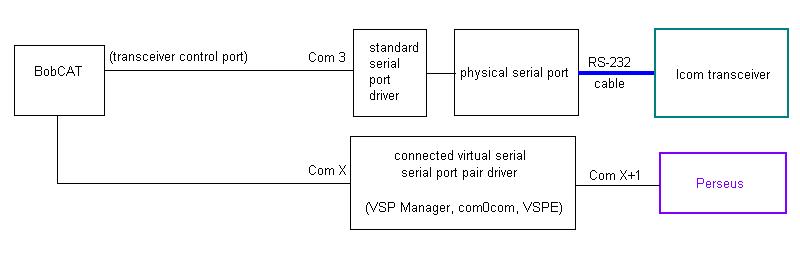
The current version of BobCAT expects to control an Icom transceiver using a configuration like this:

In the above configuration, BobCAT controls the transceiver's frequency and mode as well as the Perseus' frequency and mode, serving as a panadaptor. Because the transceiver's CAT port is exclusively used by the BobCAT, this configuration precludes traditional transceiver control -- and its interoperation with logging, spotting, digital mode, and propagation prediction/monitoring applications. This configuration is also limited to Icom transceivers
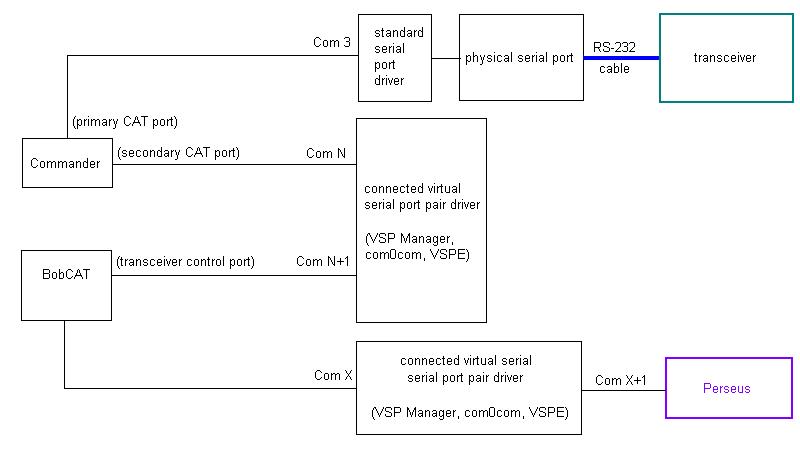
Commander's secondary CAT port can be configured to accept frequency and mode CAT commands from BobCAT and convey them to the transceiver; this configuration provides simultaneous panadaptor and transceiver control functionality, and eliminates the Icom-only restriction:

To configure Commander to accept frequency and mode CAT commands received from BobCAT,
- if you have
an Icom transceiver, follow your BobCAT's documentation to get it working with your transceiver and Perseus, as depicted in the first of the two configurations shown above; this will entail setting up a connected pair of virtual serial ports using a product like VSP Manager or com0com to create ports X and X+1 (e.g. 10 and 11).
- a non-Icom transceiver,
set up a connected pair of virtual serial ports using VSP Manager or com0com to create ports X and X+1 (e.g. 10 and 11).
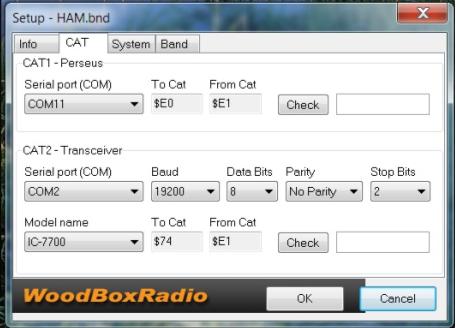
in BobCAT's Setup menu, select the CAT tab. In the CAT1 panel,
set the the Serial port (COM) to COM X
set To Cat to $E0
set From Cat to $E1
start the Perseus Software Settings application, open its Software Settings window, and set the Virtual COM Port to X+1
establish a second connected pair of virtual serial ports using an instance of the same product (e.g. VSP Manager or com0com) you used in step 1; these instructions assume that connected virtual ports N and N+1 are created (e.g. 1 and 2)
in BobCAT's Setup menu, select the CAT tab. In the CAT2 panel,
change the Serial port (COM) from the physical COM port attached to your transceiver to COM N+1
- note the baud rate, data bits, stop bits, and parity configured for CAT2
verify that the Model name selector specifies your transceiver model
verify that the To CAT setting is set to $ followed by your transceiver's CI-V address in hexadecimal; if your transceiver isn't an Icom, set To CAT to $74
verify that the From CAT setting is set to $E1
configure Commander to control your Alinco, Elecraft, FlexRadio, Icom, Kachina, Kenwood, TenTec, or Yaesu transceiver via Commander's Primary CAT Port
configure Commander's Secondary CAT Serial Port panel on its Configuration window's Ports tab
set the CAT protocol selector to BobCAT
set the CI-V Address to your transceiver's CI-V address in hexadecimal; if your transceiver isn't an Icom, set the CI-V Address to 74
click the Follow and Lead Primary button
set the Port# to Com N
the Baud selector, the Word selector, the Parity selector, and the Stop selector to the settings you noted in step 3b above
check the Enable box

Interoperating with a Software Defined Radio Console using connected virtual serial ports
