Getting Started with Antenna Rotator Control
If your antenna's rotator controller is an AlfaSpid, Green Heron, Heath, Hygain, Idiom Rotor-EZ, M-Squared, MDS, microHam ARCO, Prosistel, Radant APU1-A, SARTek, TIC, TrackBox, or Yaesu unit that can be controlled by a computer, then DXView will enable you to rotate your antenna to a selected location's short path or long path heading with a single mouse click.
To set this up,
Connect your rotator controller to a serial port on your PC as described in the rotator controller's documentation; this likely requires an RS232 cable
run DXView, and click the Main window's Config button to open the DXView Configuration window
in the DXView Configuration window, select the Rotator Control tab
in the Serial Port Interface panel,
select the PC serial Port to which your rotator controller is connected
set the Speed, Word Length, Stop Bits, and Parity to match the settings shown in your rotator controller's documentation
note: the AlfaSpid rotator documentation specifies 1200 baud; operation at higher rates is unreliable
in the Model panel, check the box designating your rotator controller model
in the Directive Acceptance by Band panel, check all boxes
If your antenna's rotator controller is a Green Heron, Hygain, Idiom Rotor-EZ, M-Squared, MDS, microHam ARCO, or Yaesu unit, check the Request rotator heading once per second box
check the Enabled box at the upper-left of the tab
To verify correct operation,
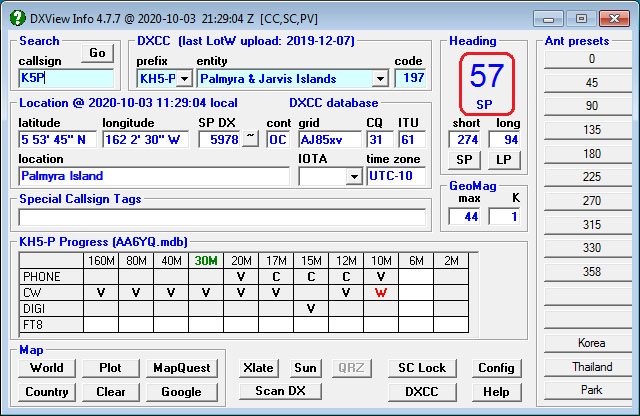
type a callsign into the Search panel on DXView's Main window, and strike the Enter key or click the Go button; the Info window's Heading panel will be updated to display short and long path headings from your QTH to this location
click the Heading panel's SP button; your antenna should rotate to the short path heading
click the Heading panel's LP button; your antenna should rotate to the long path heading
If you type a callsign into the Search panel on DXView's Main window and depress the CTRL key while striking the Enter key, your antenna will rotate to the short path heading.
If the Request rotator heading once per second option is enabled, DXView will display the most recently reported position immediately above the SP and LP buttons; otherwise, DXView will display the last position sent to the rotator:

You can also specify a heading by
* clicking a location on DXView's world map
* selecting a DXCC entity using the prefix or entity selectors on DXView's Main window
* typing a grid square into the grid box on DXView's Main window and then striking the Enter key
* typing a latitude (e.g. 37 30' 7" N) into the latitude box on DXView's Main window and then striking the Enter key
* typing a latitude (e.g. 123 10' 13" W) into the longitude box on DXView's Main window and then striking the Enter key
* typing a an IOTA tag in the IOTA box on DXView's Main window and then striking the Enter key
* typing an azimuth into the short or long boxes on DXView's Main window
After specifying a heading, initiate rotation by clicking the SP or LP buttons for short path or long path respectively.
In the above image, the last command sent to the rotator was "158 degrees, short path"; unless you subsequently djusted your rotator's heading via its controller's front panel, this should display the rotator's current heading.
Antenna Presets
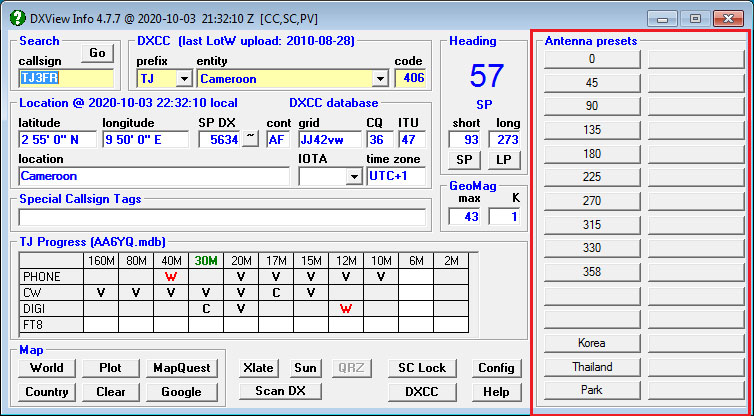
Dragging the right border of DXView's Main window to the right will expose two columns of Antenna Preset buttons:

To define one or more presets, depress the Ctrl key while clicking any preset button. DXView's Antenna Presets window will appear, enabling you to specify each preset Heading and a discriptive Caption to appear on its button.
Dragging the right border of DXView's Main window to the left will hide the Antenna Presets.
For all 15 rows of antenna presets to be visible in DXView's Main window,
- DXKeeper must be running (so that DXView's Main window displays a DXCC award progress panel)
the Query Special Callsign database box must be checked in the Options panel on the General tab of DXView's Configuration window
Rotator-specific Information
ARS-USB: after configuring ARS-USB as described by its documentation, use the Program menu's Virtual Port and Emulation command to
- create a Virtual COM Port in the range COM1 and COM16
check the Create Virtual at Startup box
set Rotor emulation set to Yaesu GS232A
on the Rotator Control tab of DXView's Configuration window
in the Model panel, select Yaesu
in the Serial Port Interface panel, select the Virtual COM Port created in step a. above
microHam ARCO: in the ARCO panel on the Configuration window's Rotator Control tab,
- to connect your computer to your ARCO via a serial port,
click the Serial button
specify the serial port parameters in the Serial Port Interface panel at the bottom of the tab
- to connect your computer to your ARCO via TCP,
click the TCP button
specify the Host Address
specify the Port
- to connect your computer to your ARCO via a serial port,
Interoperating with Green Heron Everywhere
Managing an Antenna Mounted with an Offset
If you have an antenna on your tower that is mounted with an offset of X degrees with respect to the other antennas on that tower,
In the Alignment panel on the Configuration window's Rotator Control tab,
set the Ant1 rotator offset to 0
set the Ant2 rotator offset to X (where X is an integer greater than 0 and less than 360 representing the offset between Antenna #1 and Antenna #2).
Double-clicking the Main window's Heading panel will toggle the actual heading (displayed immediately above the SP button) between Antenna #1 and Antenna #2.
Additional Information
- Managing Serial Ports and USB ports
Post a question or suggestion on the DXLab Discussion Group
